# work @ work-virtual-machine in ~/optee-fvp [23:34:36] $ ls -al total 72 drwxrwxr-x 18 work work 4096 Sep 22 23:32 . drwx------ 70 work work 4096 Sep 22 23:34 .. drwxrwxr-x 10 work work 4096 Sep 22 23:32 Base_RevC_AEMvA_pkg drwxrwxr-x 12 work work 4096 Sep 22 23:26 build drwxrwxr-x 14 work work 4096 Sep 22 23:26 buildroot drwxrwxr-x 50 work work 4096 Sep 22 23:26 edk2 drwxrwxr-x 4 work work 4096 Sep 22 23:26 edk2-platforms drwxrwxr-x 14 work work 4096 Sep 22 23:26 grub drwxr-xr-x 3 work work 4096 Jun 16 10:34 license_terms drwxrwxr-x 24 work work 4096 Sep 22 23:26 linux drwxrwxr-x 14 work work 4096 Sep 22 23:26 mbedtls drwxrwxr-x 5 work work 4096 Sep 22 23:26 ms-tpm-20-ref drwxrwxr-x 9 work work 4096 Sep 22 23:26 optee_client drwxrwxr-x 10 work work 4096 Sep 22 23:26 optee_examples drwxrwxr-x 10 work work 4096 Sep 22 23:26 optee_os drwxrwxr-x 7 work work 4096 Sep 22 23:26 optee_test drwxrwxr-x 7 work work 4096 Sep 22 23:26 .repo drwxrwxr-x 19 work work 4096 Sep 22 23:26 trusted-firmware-a
编译
编译流程参考上面qemu_v8部分
1
2
3
4
5
# work @ work-virtual-machine in ~/optee-fvp [23:35:06] $ cp -rf Base_RevC_AEMvA_pkg Foundation_Platformpkg # build toolchains的时候文件夹名需要改一下 $ cd build $ make toolchains $ make DEBUG=1 FVP_USE_BASE_PLAT=y -f fvp.mk all
开启调试
修改build/fvp.mk ,以便启动时进入调试模式
添加:
1
2
-I \ --iris-allow-remote\
1 2 3 4 5 6 7 8 9 10 11 12 13 14 15 16
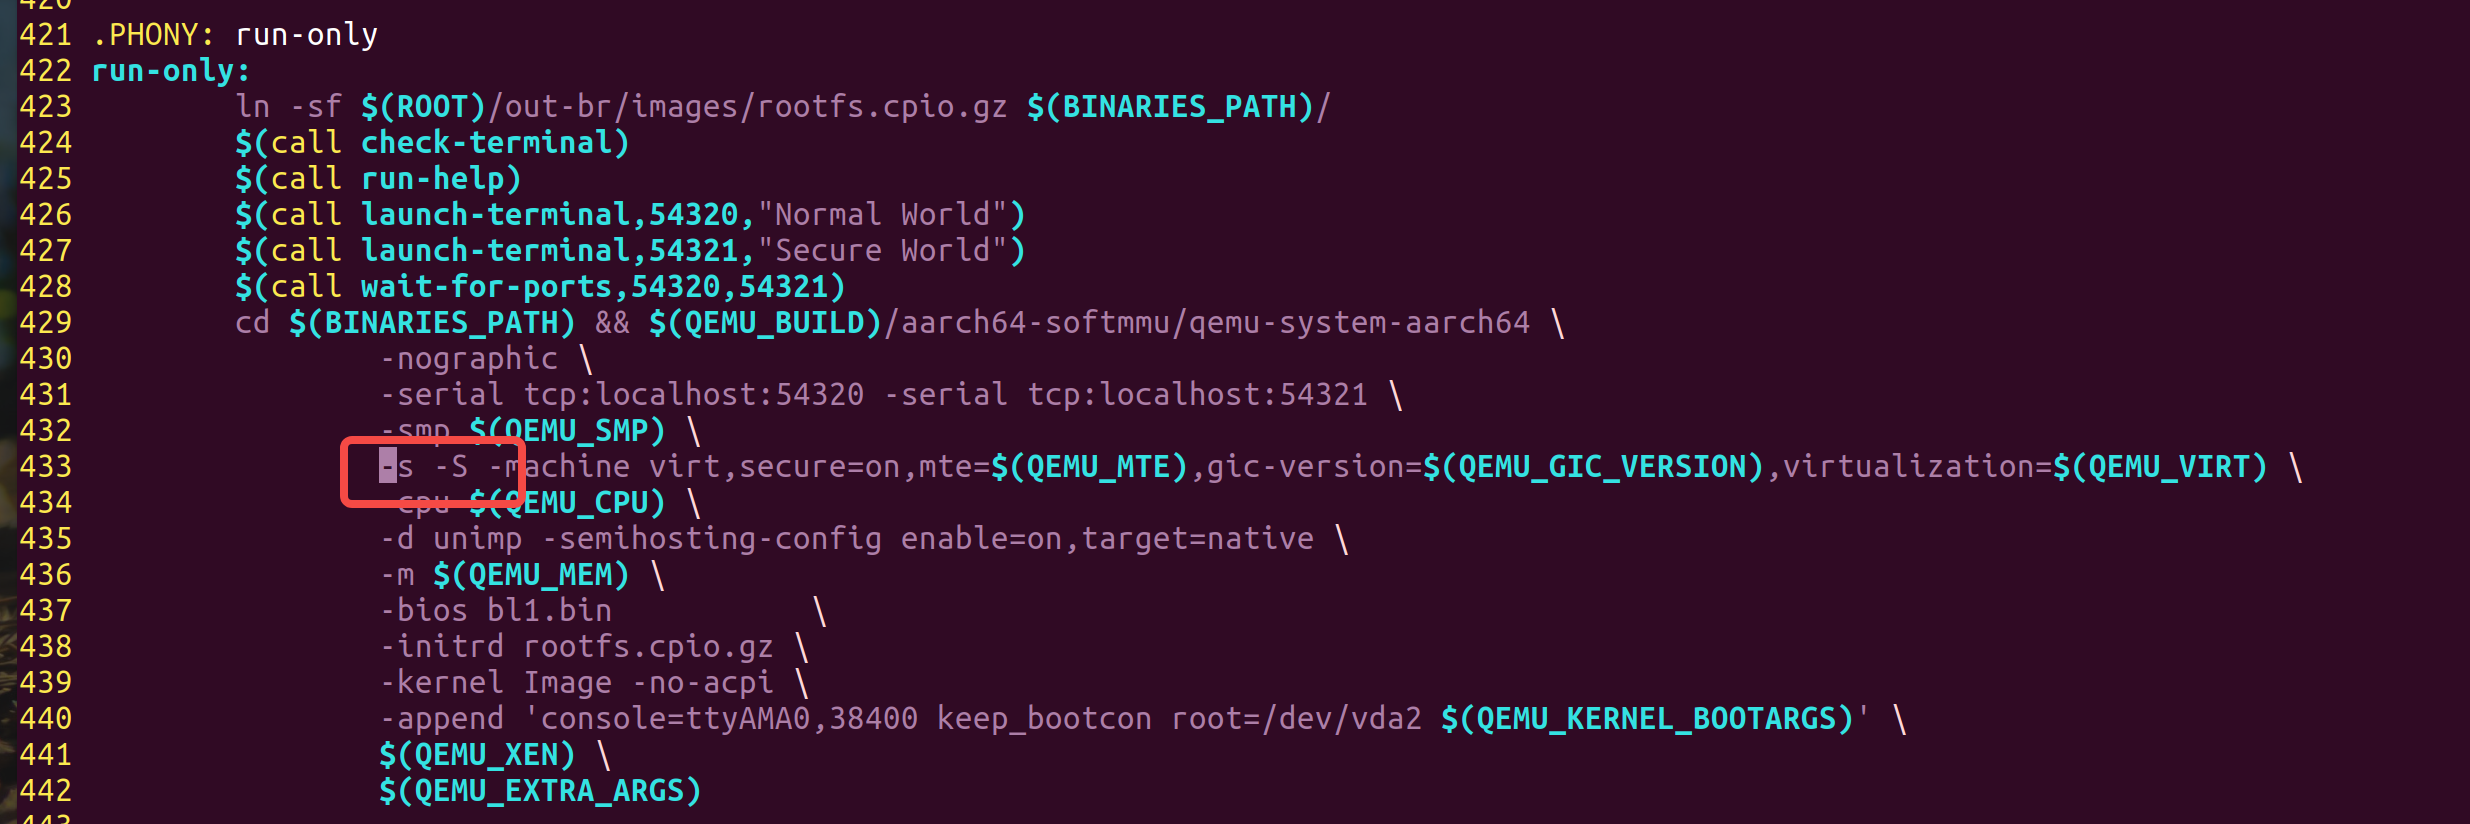
################################################################################ # Run targets ################################################################################ # This target enforces updating root fs etc run: all $(MAKE) run-only
# System Memory(2GB - 16MB of Trusted DRAM at the top of the 32bit address space) gArmTokenSpaceGuid.PcdSystemMemoryBase|0x80000000 gArmTokenSpaceGuid.PcdSystemMemorySize|0x7F000000
BaseAddress = 0x08000000|gArmTokenSpaceGuid.PcdFdBaseAddress # The base address of the Firmware in Flash0.
!else
BaseAddress = 0x88000000|gArmTokenSpaceGuid.PcdFdBaseAddress # UEFI in DRAM + 128MB.
!endif
Size = 0x04000000|gArmTokenSpaceGuid.PcdFdSize # The size in bytes of the device (64MiB).
ErasePolarity = 1
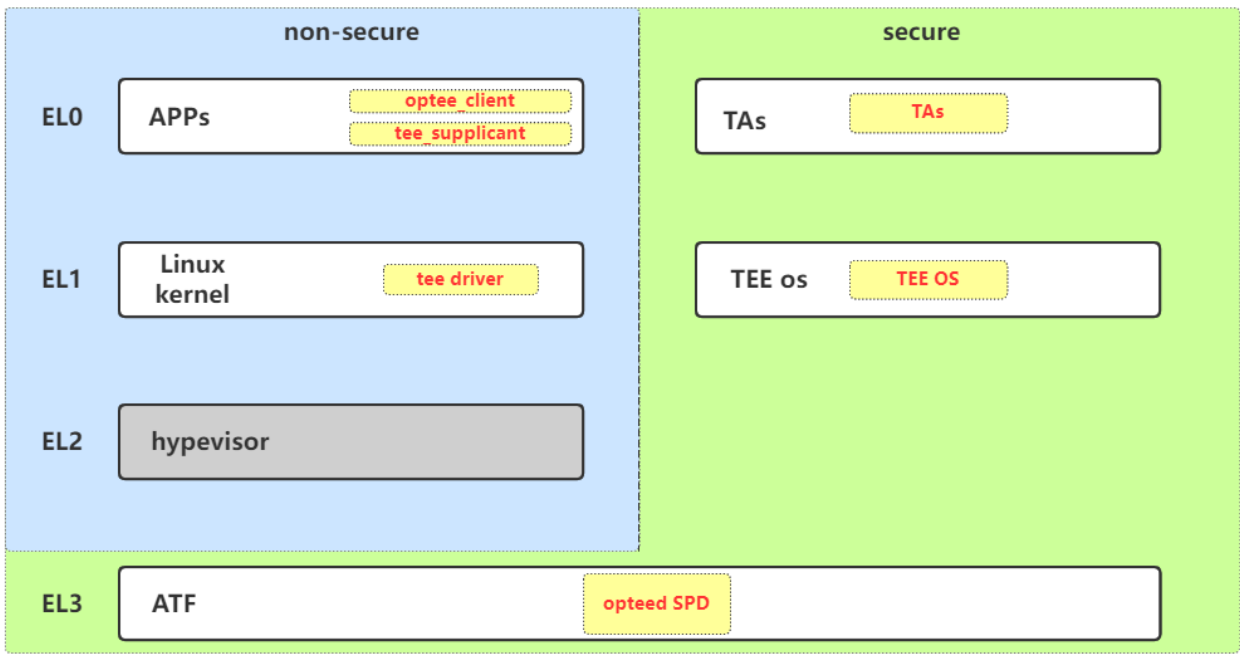
bl33
UEFI
b *EL2N:0x88000000
断点触发后, 执行下面的命令加载符号。
1
source /home/muhe/Study/optee-fvp/edk2/ArmPlatformPkg/Scripts/Ds5/cmd_load_symbols.py -a -m (0x80000000, 0x7F000000) -f (0x88000000, 0x04000000)
1 2 3 4 5 6 7 8
info files
Symbols from "/home/muhe/Study/optee-fvp/edk2-platforms/Build/ArmVExpress-FVP-AArch64/DEBUG_GCC49/AARCH64/ArmPlatformPkg/PrePi/PeiUniCore/DEBUG/ArmPlatformPrePiUniCore.dll".
Local exec file:
        "/home/muhe/Study/optee-fvp/edk2-platforms/Build/ArmVExpress-FVP-AArch64/DEBUG_GCC49/AARCH64/ArmPlatformPkg/PrePi/PeiUniCore/DEBUG/ArmPlatformPrePiUniCore.dll", file type ELF64.
        Entry point: EL2N:0x0000000088000800.
        EL2N:0x0000000088000800 - EL2N:0x0000000088018AD7 is .text
        EL2N:0x0000000088019000 - EL2N:0x000000008801916F is .data
Symbols from "/home/muhe/Study/optee-fvp/edk2-platforms/Build/ArmVExpress-FVP-AArch64/DEBUG_GCC49/AARCH64/MdeModulePkg/Core/Dxe/DxeMain/DEBUG/DxeCore.dll".
Local exec file:
        "/home/muhe/Study/optee-fvp/edk2-platforms/Build/ArmVExpress-FVP-AArch64/DEBUG_GCC49/AARCH64/MdeModulePkg/Core/Dxe/DxeMain/DEBUG/DxeCore.dll", file type ELF64.
        Entry point: EL2N:0x00000000FE3D4000.
        EL2N:0x00000000FE3D4000 - EL2N:0x00000000FE41AEBF is .text
        EL2N:0x00000000FE41B000 - EL2N:0x00000000FE435860 is .data
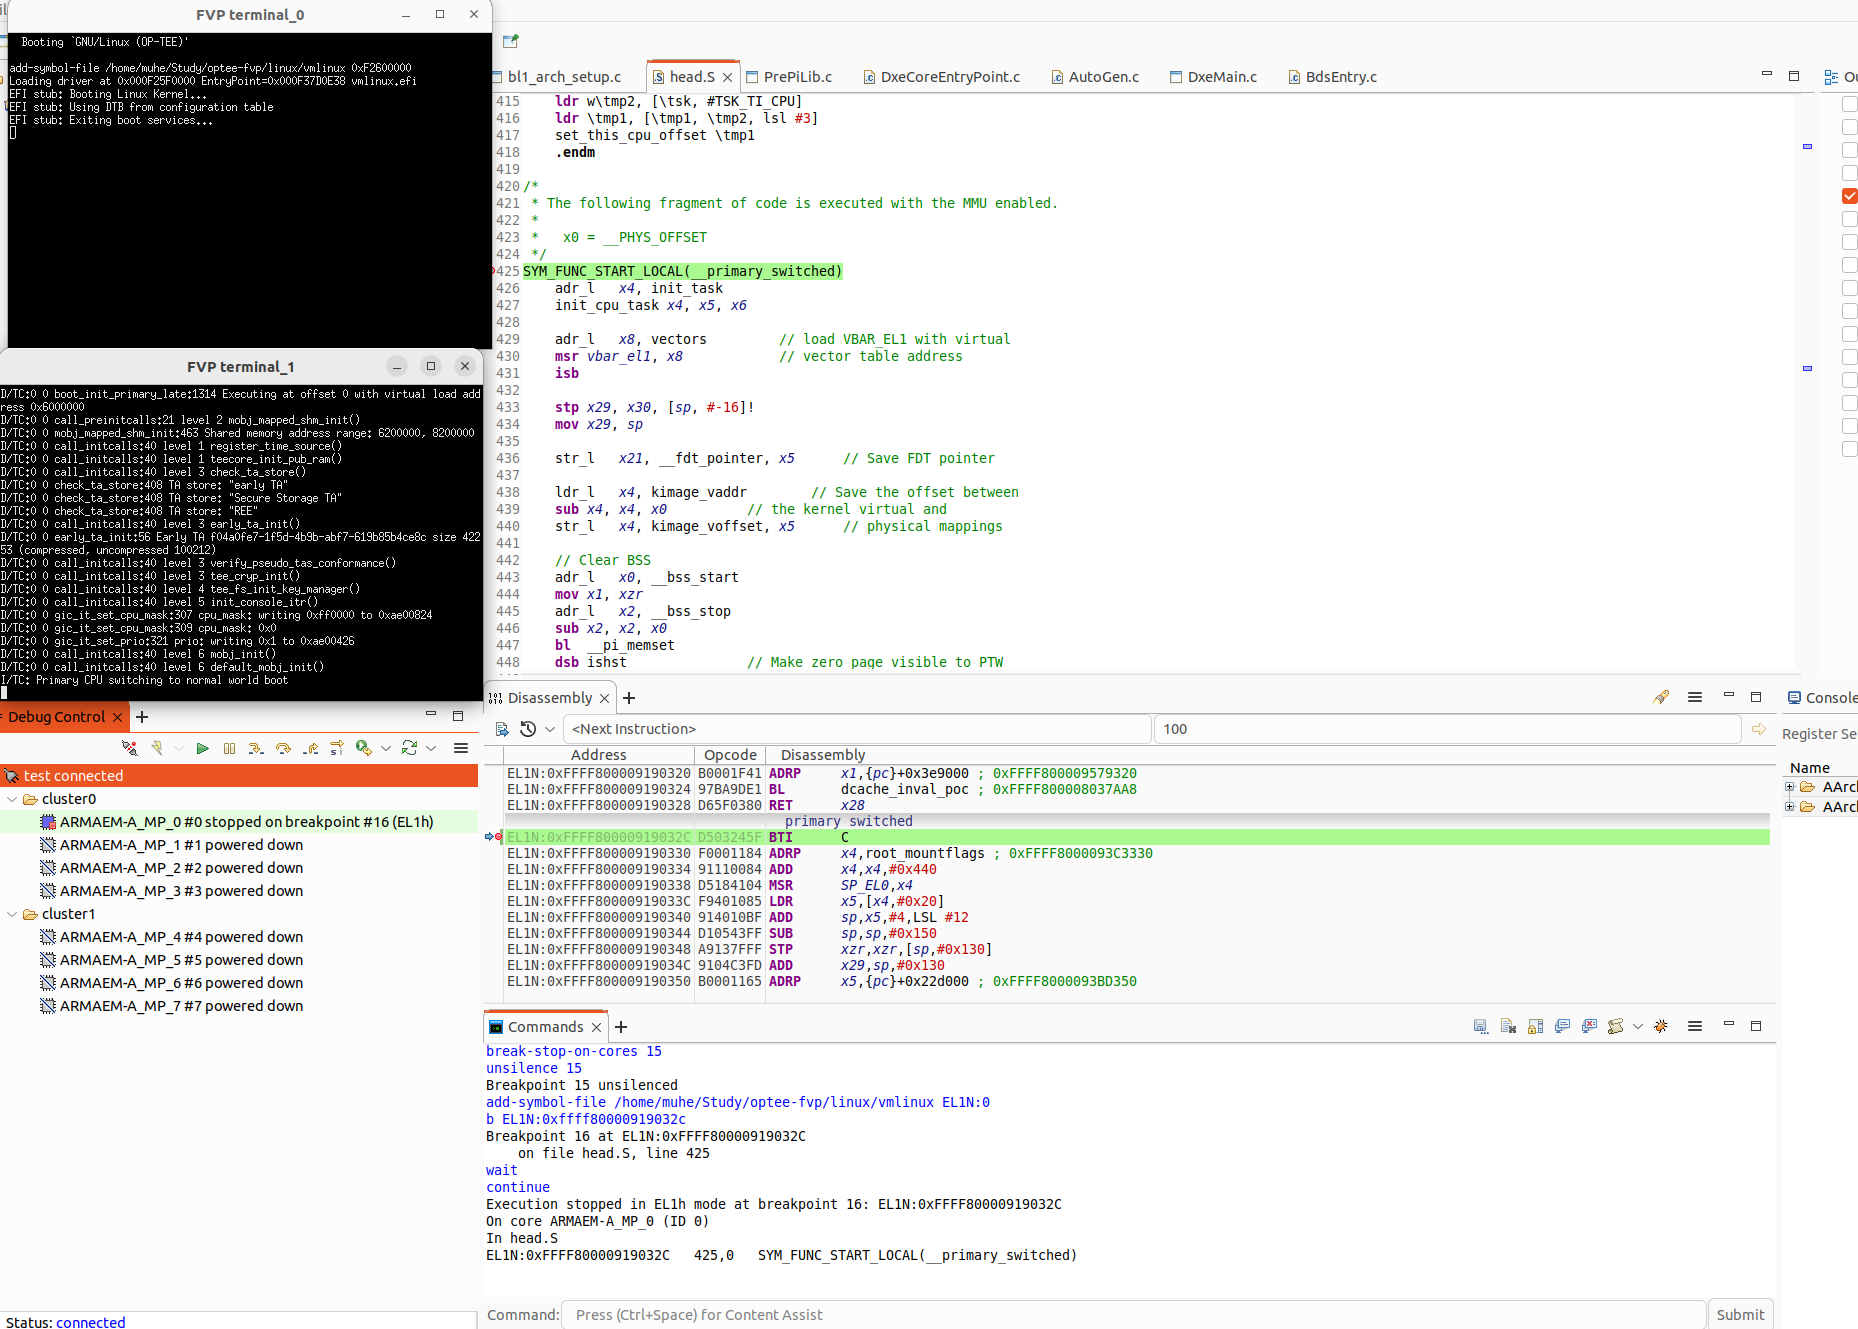
# muhe @ muhe-NUC11PAHi5 in ~/Study/optee-fvp/linux on git:29aee39cf x [23:24:42]
$ cat System.map | grep "primary_switched"
ffff80000919032c t __primary_switched